I never got back to you on how the soup worked out did I?
It was good! Suprisingly tasty!
When we took the baked mixture from the oven it was all a but too liquidy so before blending we drained the excess milk off - putting it on one side to thin down the pureed vegetable mixture after blending.
It was so good that I''ve been motivated to try out other soups. Stay tuned!
Tuesday, 1 May 2012
Thursday, 19 April 2012
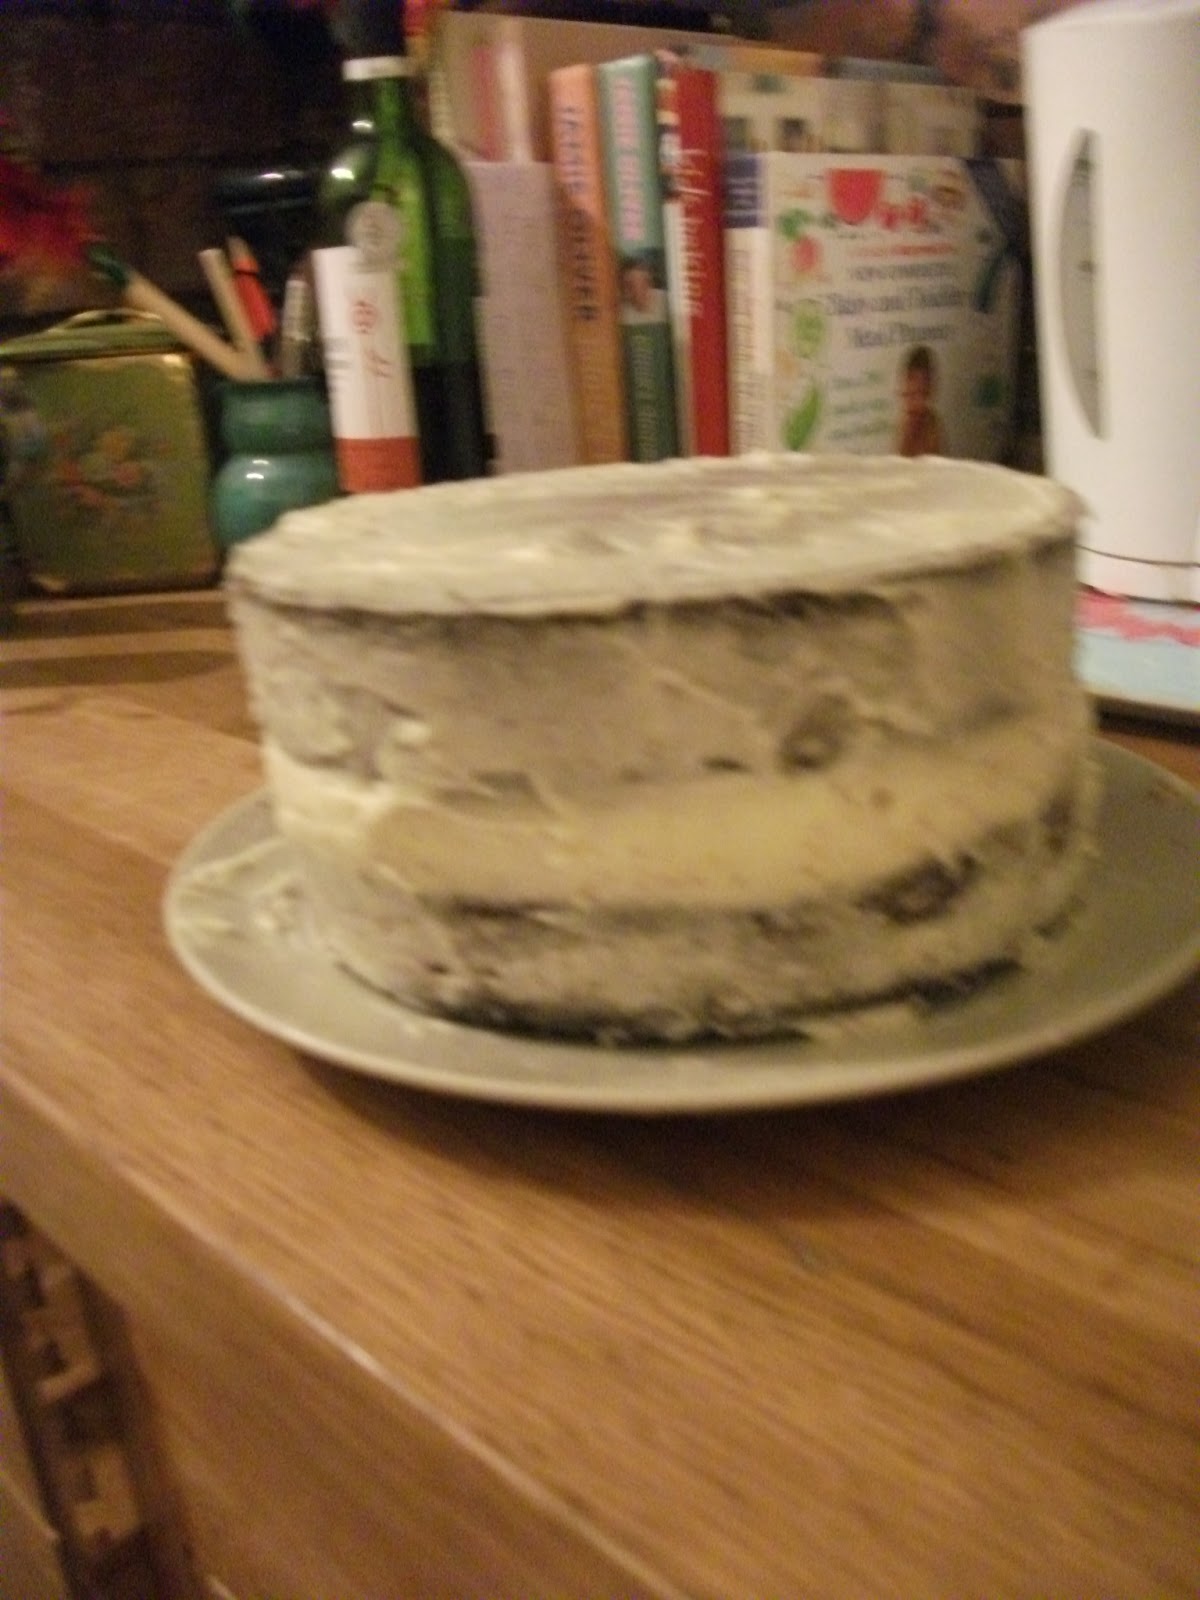
Simple leek and potato soup
We're currently on holiday in drizzly North Norfolk. Snuggled up this evening in front of a log burning stove watching Harry Potter, it's not so bad being on holiday in the rain. As we only have another day of our holiday left, we're tring to use up remaining food supplies.
Which brings us to my attempt at what must be the worlds simpliest leek and potato soup. Here's the ingredients I had available to work with:-
3 medium sized leeks
4 medium potatoes
milk
butter
salt
pepper
I've sauteed the chopped leek and potato in butter before seasoning and adding enough milk to cover the vegetables. I then transferred to the oven in a baking dish in the hope that by baking the ingredients they will become richer and somehow more tasty.
The aim is to blend up the baked mixture in aspproximately 10 minutes time when it will have baked for 40 minutes at 200C. And then we'll be serving up with the garlic bread that needs eating up.
I'll let you know how it turns out!
Friday, 6 April 2012
Ooh la la
Last Monday was our first wedding anninversary. We had decided we would stay in and so it seemed like the perfect time to cook up a fancy dinner.
I'm not sure a beef stew, or casserole if you prefer, could be deemed as being fancy. Unless of course, it has French origins. All things Frech seem a little bit more fancy to me. And none more so than when it comes to food.
Which is how I came to be cooking up THE most delicious Beef Bourguignon. I used a Rachel Khoo recipe - which can be found by clicking here. I'll try to post the recipe soon when I have more time.
For anyone unfamiliar with Rachel Khoo, she is the one of 'The Little Paris Kitchen' which is both the title of her cookery book and the BBC2 programme which is showing in the UK on Monday evenings at 8.30pm.
I love and loath this Rachel woman in equal measure. She is gorgeous, funny, and passionate about food. She manages to be both glamourous, AND quirky. She's cool in a chic-vintage sort of way. For heavens sake, the woman lives and cooks in Paris. I WANT TO BE HER. I want to speak French fluently as I mingle with the locals - my neighbours - after having moved to the beautiful city to train as a pastry chef.
Anyway. Rachel Khoo I may not be. But it turns out that I, like Rachel, can cook up a mean Beef Bourguignon. When I use her recipe ;)
It may not be the prettiest of dishes to serve up, but with it's rich red wine sauce infused with fragrant rosemary and thyme, it tastes fantastic! We ate ours with roasted root vegetables glazed in maple syrup, pan-fried green beans and creamy mash...perfection.


I'm not sure a beef stew, or casserole if you prefer, could be deemed as being fancy. Unless of course, it has French origins. All things Frech seem a little bit more fancy to me. And none more so than when it comes to food.
Which is how I came to be cooking up THE most delicious Beef Bourguignon. I used a Rachel Khoo recipe - which can be found by clicking here. I'll try to post the recipe soon when I have more time.
For anyone unfamiliar with Rachel Khoo, she is the one of 'The Little Paris Kitchen' which is both the title of her cookery book and the BBC2 programme which is showing in the UK on Monday evenings at 8.30pm.
 |
| Rachel Khoo. Picture from the Guardian Website |
I love and loath this Rachel woman in equal measure. She is gorgeous, funny, and passionate about food. She manages to be both glamourous, AND quirky. She's cool in a chic-vintage sort of way. For heavens sake, the woman lives and cooks in Paris. I WANT TO BE HER. I want to speak French fluently as I mingle with the locals - my neighbours - after having moved to the beautiful city to train as a pastry chef.
Anyway. Rachel Khoo I may not be. But it turns out that I, like Rachel, can cook up a mean Beef Bourguignon. When I use her recipe ;)
It may not be the prettiest of dishes to serve up, but with it's rich red wine sauce infused with fragrant rosemary and thyme, it tastes fantastic! We ate ours with roasted root vegetables glazed in maple syrup, pan-fried green beans and creamy mash...perfection.


Sunday, 1 April 2012
It's about time
Hello food lovers :)
It's about time I updated you on why we've been so rubbish in the cooking and blogging department recently. For the last month Joe and I have been failing miserably in the culinary challenge we have set ourselves.
"Why is this?" I keep asking myself. A few thoughts spring to mind:
I've decided I need some new inspiration. This has provided me with the perfect excuse to place a order with a well know online retailer for three new cookery books. I realise three is a bit greedy but they were a good price and I was salivating at the thought of them. I'll tell you all about them when they arrive.
I'm going to post more frequently about any food related thoughts rather than restricting myself to it always being a full recipe that we've cooked as part of this year's food challege.
I'm also going to reorganise the kitchen so it is a nicer ad easier place to be.
And we're going to cross our fingers for less illness! We'll stick with the sunshine and work around that though :)
It's about time I updated you on why we've been so rubbish in the cooking and blogging department recently. For the last month Joe and I have been failing miserably in the culinary challenge we have set ourselves.
"Why is this?" I keep asking myself. A few thoughts spring to mind:
- We keep getting ill. Nothing serious but cold after cold after virus after rubbish virus. If it's not me it's Joe and he if not's Joe it's Andy or Will. All in al,l it's left me feeling like I'm running low on energy. So there's been less effort being put in on the cooking and baking front.
- The sun has been shining more. Which means I've been out and about more instead of being holed up in the kitchen or sat on the sofa blogging.
- I've been lazy about writing up the recipes we have cooked recently and now it feels like I can't catch-up so I keep avoiding writing anything!
- We've been having work done on the house, in the kitchen and bathroom. It's been chaos. Things are settling now despite there still being decorating to be done so hopefully this will encourage me back into the swing of things.
- There are a limited number of things Joe is interested in cooking. Only things he wants to eat, which is fair enough. The problem is, he's quite limited in what he will eat, although he is getting a litttle more adventuress as he gets older.
I've decided I need some new inspiration. This has provided me with the perfect excuse to place a order with a well know online retailer for three new cookery books. I realise three is a bit greedy but they were a good price and I was salivating at the thought of them. I'll tell you all about them when they arrive.
I'm going to post more frequently about any food related thoughts rather than restricting myself to it always being a full recipe that we've cooked as part of this year's food challege.
I'm also going to reorganise the kitchen so it is a nicer ad easier place to be.
And we're going to cross our fingers for less illness! We'll stick with the sunshine and work around that though :)
Wednesday, 14 March 2012
Speckled Mocha Cake for Valentines Day
I've finally got around to posting this - approximately four weeks after the event!!
Andy loves coffee cake. He also enjoys drinking the occcasional mocha. And so this cake, which combines the two, seemed like a nice idea to make him as a gift on Valentine's Day - particularly after he'd shamed me on the V-Day morning by giving me a wonderful locket containing photos of our boys and I had failed to come up with any gift. Yes, sometimes I am a rubbish wife when it comes to romance :o Thankfully, this cake made up in some way for my lack of forward planning!
These were the ingredients the lovely 'Great British Bake Off' book advised me to use:-
For the sponge:-
175g unsalted softened butter
175g caster sugar
3 large eggs at room temp
175g self-raising flour
1/4 teaspoon baking powder
1& 1/2 tablespoons instand coffee dissolved in 2 tablespoons water
50g dark chocolate
For the filling
50g dark chocolate, grated
1 tablespoon instand coffee dissolved in 1 tablespoon of water
50g unsalted softened butter
100g icing sugar, sifted
Extra icing sugar to sift onto top of cake when finished.
I preheated the oven to 180C. The butter was mixed util creamy before adding the sugar and beating in until the mixture became very pale and fluffy - it can feel like hard work so bear with it, you'll get there in the end!
The eggs were whisked with a fork and gradually added to the butter mixture, beating in well each time.The flour and baking powder were sifted and were folded in gently(with a metal spoon) to the butter mixture followed by the coffee and grated chocolate.
The mixture was divided between 2 tins and baked for approx 20 mins until the sponges sprang back when pressed. The sponges were left to cool.
To make the filling, the chocolate was broken into pieces into a glass bowl that was placed above a pan of hot water on the stove. The coffee (dissolved in water) was added and the mixture stirred until all the cholcolate had melted. The butter was stirred in and then the icing sugar was added and mixed in. I left the mixture to cool until it became thick enough to spread onto one of the sponges. The other sponge was placed on top.
Icing sugar was gently dusted (through a sieve) on top to finish. I made a heart shape from baking parchment to make the pattern.
Delicious!
________________________________--
So delicious in fact that I baked this again as part of an early Mothers Day celebration last weekend.
Tuesday, 21 February 2012
Week 7 of our 2012 culinary challenge!
Ju made a 'speckled mocha cake'
Joe made cheese and ham sandwiches - ok, so to say this is cooking is pushing it a bit!!
Joe made cheese and ham sandwiches - ok, so to say this is cooking is pushing it a bit!!
Spanish choritzo and chickpea soup (Jamie Oliver)
I was drawn to this recipe because I adore choritzo. It works really well with chickpeas and so I thought this was sure to taste good. As Jamie points out though, it's not the pretttiest of dishes but try not to be put off by this.
• olive oil
• 150g chorizo sausage, finely chopped
• 1 onion, peeled and finely chopped
• 1 clove of garlic, peeled and finely chopped
• 2 sticks of celery, finely chopped
• 2 large bags of fresh spinach, washed and chopped
• 8 fresh tomatoes, deseeded and roughly chopped
• 1 x 410g tin or jar of good-quality cooked chickpeas, drained
• 1.3 litres chicken stock
• sea salt and freshly ground black pepper
• 1 packet of prosciutto, finely chopped
• 2 hard-boiled eggs, finely chopped
A word of warning, you need a very large pan for this dish! I started off with a pan way too small and ended up transferring to my 'jam pan' right around the point of adding the spinach...
To begin, I lightly fried the chorizo in a little olive oil and then added the onion, garlic and celery. This was left to cook on a low heat for about 15mins with a lid on the pan. I added the spinach, tomatoes, chickpeas and and chicken stock. After bringing to the boil, the heat is then lowered to a simmer for approximately 40 minutes.
After this time, about a third of the mixture should be blended to a puree before being returned to the pan mixed back in. The pan is then removed from the heat and the proscuitto ham and finely chopped egg is added - which seems a little odd but adds lots of lovely rich flavour. Then it's time to eat! We served ours with some chunks of warmed bread with butter.
To be completely honest, the finished result looked a little bit like a bowl of sick - as is the way with chunky soups, even, it would seem, the Spanish variety. If you can get past the look of it though, the flavours are amazing. All in all, completely decicious when eaten blind folded :)
Week 6 of our 2012 culinary challenge!
This week Ju made Jamie Oliver's Spanish Choritzo and Chickpea Soup
Joe didn't cook as he wasn't well.
Joe didn't cook as he wasn't well.
Saturday, 18 February 2012
Red Velvet Celebration Cake
 Another Lorraine Pascale recipe. I seem to have a serious crush on this womans' cooking ad baking at the moment!
I decided to bake a cake for my friends birthday. I was never going to make the three tier version - I love my friend but not three tiers worth of love ;-). And so, I made the middle tier (23cm/9in). These were the ingredients I used.
350g/12oz butter, softened, plus extra for greasing
350g/12oz caster sugar
6 free-range eggs
½ tsp vanilla essence
pinch salt
300g/10oz plain flour
50g/2oz cocoa powder
1 tbsp baking powder
50ml/2fl oz red food colouring
800g/1¾lb ready-to-roll white icing
I began by turning the over to 180C and lining my cake tins with greaseproof paper at the base and greasing with butter.
I beat together the butter and sugar until soft and fluffy before gradually mixing in the eggs, vanilla extract, salt and half of the flour. The rest of the flour was added along with the cocoa and baking powder. Combine the mixture before adding the food colouring and mixing. I was undecided as to whether it looked fab in it's redness or looked as if I'd injured myself and bled into the cake mix!
I poured the mixture into two tins (rather than the one that Lorraine advices), half in each tin, and baked in the oven for around 40 mins. When it's ready, a skewer - or in my case a knife - will come out clean after being inserted into the middle of the baking cake. Once ready, the cake should be left to cool for a few minutes until the tin is cool enough to touch. The can can then be removed from the tin and left to cool completely on a wire rack.
Next it's time time to make the buttercream, using these ingredients:-
- 365g butter, softened
- 900g/icing sugar
- 115g cream cheese
- few drops vanilla extract
 After creaming together the butter and sugar until it was creamy and fluffy, I then added the cream cheese and vanilla essence and mixed them in well. I used a third of this mixture to sandwich the two cakes together. Another third of the mixture was then used to coat the (sandwiched) cake - in the way that you might use marzipan or apricot jam as the 'undercoat' to the sugarpaste icing. I found that using a palet knife was the easiest way to achieve a smooth finish. I put the cake in the fridge for the buttercream coating to set - 30 mins to half an hour. Using the remaining buttercream mixture a second coating is put onto the cake and again the cake needs to be put inn the fridge for the buttercream to set.
Once set, the cake is ready to be iced in the sugarpaste. The icing needs to be kneaded until soft and then rolled out on a clean surface that has been dusted in icing sugar. Once the icing was rolled out enough to coverr the cake I lifted it carefully over my rolling pin and placed it over the cake, pressing down gently at the sides. Ideally at this stage, to achieve a professional finish, cake smoothers should be used to 'polish' the cake. At this stage you can then decorate as you wish. I used a flower shaped plunger cutter to cut out the (bought ready made) red sugarpaste flowers and then I used edible glue to stick then onto my iced cake and put a 'dot' of white icing in the middle. And this was the result....
Wednesday, 15 February 2012
What's going on?
I'm all behind myself and have loads of recipes we've been busy cooking and baking that I need to write up...I plan to get back on top of things over the weekend! In the meantime plesae bear with me. You can see some of what's been keeping me busy by clicking here.
Wednesday, 8 February 2012
Blueberry pancakes with crisp prosiutto and maple syrup - a Lorraine Pascale recipe

Firstly, I can't stress enough just delicious these are. No, seriously. If you have any self respect then you owe it to yourself to eat these at least once in your lifetime. I plan to fit in as many helpings as I can in the time I have left. In fact this recipe should probably come with a health warning - "these pancakes can seriously improve your life". I'll say no more. Let's cook!
These are the ingredients:
- vegetable oil for frying
- Ix pack of procuitto
- 250g plain flour
- 15g baking powder
- pinch of salt
- 1 tsp sugar
- 300ml sour cream
- 100ml warm water
- 200g of blueberries

Lorraine advises putting the oven on low - in anticipation of needing to keep some of the pancakes warm whilst cooking the some more - this is a good tip. I lightly fried (in a frying pan) the procuitto in a little of the oil until it began to 'crisp' and then put it to one side. It's a good idea to 'blot' it with kitchen roll to soak up the oil and maintain the 'crisp'. I turned off the heat but kept the oil in the frying pan to use later for frying the pancakes.

Time to make the pancake mix. I combined the flour, baking powder, salt and sugar in a mixing bowl and then made a large hole in the centre. After mixing together the sour cream and water in a measuring jug I then added this to the flour mixture - pouring into the hole in the centre and then gradually drew the flour mixture in. I beat the mixture for a few minutes to get some air into it. If lumps start apprearing, Lorraine advises us to beat the mixture like mad'. The blueberries were then gently stirred in to the mixture.
I reheated the oil in the frying pan over a medium heat before spooning 3 large (seperate) blobs of the pancake miture into the frying pan.

Once golden brown underneath, the pancakes were flipped over to cook the other side. When they are cooked they look nicely firm and set on the sides. Whilst cooking the next batch the cooked pancakes can be placed on a baking tray in the warm oven.

Once all the pancakes were cooked, I built a tower of pancakes with the crisp prosiutto placed inbetween each layer and then added a generous drizzle of maple syrup to the top and let it run down the layers of the tower.
Then of course comes the best bit...the eating! Go on, get stuck in!! We served our pancakes up on vintage mismatched china - the perfect 'fancy' anniversary brunch :)


Tuesday, 7 February 2012
Week 5 of our 2012 culinary challenge!
Ju made:-
- blueberry pancakes with prosiutto and maple syrup - new favourite thing to eat in the world ever!!!
- a red velvet celebration cake
Friday, 3 February 2012
Friday favourites! (2)
Warming winter chilli
This is a definte favourite in our house. We make huge vats of it and freeze it so that we can eat it for weeks to come. I first posted this recipe on my blog 'Ju's musings on life' - in the 'foody things' section.

Ingredients
· 4 onions
· 2 cloves garlic
· 4 tablespoons olive oil
· chilli powder – as much or as little as you prefer, I usually start off with 2 teaspoons but it really depends on your taste and the strength of the chilli powder. More can be added when all ingredients are bubbling away. Alternatively you could use fresh chillies – again, to taste.
· 2 teaspoons ground coriander
· 2 teaspoons ground cumin
· 1 teaspoon ground ginger (optional – adds a nice seasonal touch at Christmas)
· 2 cinnamon sticks or 1 teaspoon
·2 red peppers
· 1.5kg minced beef
· 4 x 400g cans chopped tomatoes
· Tomato ketchup, to taste - Nigella recommends 8 tablespoons
· 1 tube of tomato puree, or to taste
· 250ml water – or as much as you think it needs
· 2 tablespoons cocoa or grated dark chocolate – I currently use a wonderful pure cacao bar from Willie’s World Class Cacao which is brilliant for cooking.
· 2 x 400g cans red kidney beans – I prefer to use the “chilli beans” as they give more flavour
Method
· Add the tomatoes, kidney beans, tomato puree and tomato ketchup
· Add as much water as you feel it needs at this stage – I don’t like it to be too runny and you can always let it down more later.
· Bring to the boil and the add the cocao powder or grated dark chocolate – don’t be tempted to miss this out as it really creates a richness in both colour and flavour.
· Simmer for 2 hours - have a taste now and again to see if you would like to add more chilli powder, ketchup or water.
You can now either save the mixture until later, cool and freeze, or immediately bake. Either way, before serving, the chilli should be baked in the oven – gas mark 7/220C – for 30–40 mins. I sometimes add buttered bread to the top 20 mins before it’s ready.
Serve in a variety of ways:- with boiled rice, taco shells, jacket potatoes, and accompany with sour cream, natural yoghurt, guacamole.
_________________________________________________________
Tell me, what's your Friday Foodie Favourite? Leave me a comment below!
This is a definte favourite in our house. We make huge vats of it and freeze it so that we can eat it for weeks to come. I first posted this recipe on my blog 'Ju's musings on life' - in the 'foody things' section.

This recipe is based on Nigella’s ‘cornbread topped chilli’ – although I’ve never made the cornbread - combined with a few tips and tricks from Jamie Oliver. It turns out different each time I make it but it’s always delicious.
I would estimate the quantities below would serve around 8 to 10 (rather than the 16 that Nigella quotes) main course portions but really it depends on how big you like those portions to be and what you serve it with. Ingredients
· 4 onions
· 2 cloves garlic
· 4 tablespoons olive oil
· chilli powder – as much or as little as you prefer, I usually start off with 2 teaspoons but it really depends on your taste and the strength of the chilli powder. More can be added when all ingredients are bubbling away. Alternatively you could use fresh chillies – again, to taste.
· 2 teaspoons ground coriander
· 2 teaspoons ground cumin
· 1 teaspoon ground ginger (optional – adds a nice seasonal touch at Christmas)
· 2 cinnamon sticks or 1 teaspoon
·2 red peppers
· 1.5kg minced beef
· 4 x 400g cans chopped tomatoes
· Tomato ketchup, to taste - Nigella recommends 8 tablespoons
· 1 tube of tomato puree, or to taste
· 250ml water – or as much as you think it needs
· 2 tablespoons cocoa or grated dark chocolate – I currently use a wonderful pure cacao bar from Willie’s World Class Cacao which is brilliant for cooking.
· 2 x 400g cans red kidney beans – I prefer to use the “chilli beans” as they give more flavour
Method
· Add the tomatoes, kidney beans, tomato puree and tomato ketchup
· Add as much water as you feel it needs at this stage – I don’t like it to be too runny and you can always let it down more later.
· Bring to the boil and the add the cocao powder or grated dark chocolate – don’t be tempted to miss this out as it really creates a richness in both colour and flavour.
· Simmer for 2 hours - have a taste now and again to see if you would like to add more chilli powder, ketchup or water.
You can now either save the mixture until later, cool and freeze, or immediately bake. Either way, before serving, the chilli should be baked in the oven – gas mark 7/220C – for 30–40 mins. I sometimes add buttered bread to the top 20 mins before it’s ready.
Serve in a variety of ways:- with boiled rice, taco shells, jacket potatoes, and accompany with sour cream, natural yoghurt, guacamole.
_________________________________________________________
Tell me, what's your Friday Foodie Favourite? Leave me a comment below!
Thursday, 2 February 2012
Joe makes cornflake and rice krispie cakes
Joe was really up for cooking when it came to making these cornflake and rice krispie cakes for 'bun day' at school the next day. Each Friday it's 'bun day' and the year groups take it in turns to provide the buns. Each child in the school pays 20p for a bun and the money either goes into the school fund for supplementing school trips and things like that or it is given to charity if there is something like Comic Relief or Children in Need happening at the time .
As unlikely as it sounds, we followed a Nigel Slater recipe. Who would have thought Nigel would spend his time making cornflake cakes!
These were the ingredients

As unlikely as it sounds, we followed a Nigel Slater recipe. Who would have thought Nigel would spend his time making cornflake cakes!
These were the ingredients
- 50 g butter
- 4 tbsp golden syrup
- 100 g dark chocolate
- 75 g cornflakes
We melted the butter, chocolate and syrup in a pan. Once melted and mixed together we stirred in the cornflakes. When the cornflakes were covered in the chocolatey mixture we put large spoonfuls into bun cases on a baking tray which was then placed in the fridge to let the cakes set.


We then repeated the process using rice krispies. Simple and delicious. Thakfully we made lots so that we didn't have to take them all into school!


We then repeated the process using rice krispies. Simple and delicious. Thakfully we made lots so that we didn't have to take them all into school!

Wednesday, 1 February 2012
Roasted cherry tomato and goats cheese tart
I based this recipe on Delia's roasted tomato and goats cheese tart with thyme. I didn't have any thyme though (why do I never have all the ingredients???) and I didn't use garlic (I'm currently trying to avoid it as I'm still breatfeeding our baby, Will), so I adapted Delia's recipe and it was very tasty..
These were the ingredients I used - sorry the quantaties are vague, I tend to go with my gut feeling when cooking (too risky when baking though!):-
The tart took approx. 45 mins to bake and was then ready to serve- when the pastry was golden and the tomatoes looked caramelised. I served it with rocket leaves and a gorgeous fig and vanilla balsamic vinegar...yum! It was delicious. I will definitely be making this dish again, very little prepartion, easy to make and very tasty. I think it would be good with red onion too.

These were the ingredients I used - sorry the quantaties are vague, I tend to go with my gut feeling when cooking (too risky when baking though!):-
- a pack of ready made puff pastry, I used frozen pastry that I defrosted and rolled out to a thickness of about 1.5cm.
- a pack of goats cheese
- as many cherry tomatoes - each sliced into 3 or 4 slices - as it takes to cover the surface of the tart
- a drizzle of olive oil
- a pinch of black pepper
- a pinch of salt
The tart took approx. 45 mins to bake and was then ready to serve- when the pastry was golden and the tomatoes looked caramelised. I served it with rocket leaves and a gorgeous fig and vanilla balsamic vinegar...yum! It was delicious. I will definitely be making this dish again, very little prepartion, easy to make and very tasty. I think it would be good with red onion too.

Monday, 30 January 2012
Week 4 of our 2012 culinary challenge!
Ju made goats cheese and cherry tomato tartlet and a red velvet celebration cake.
Joe made cornflake and rice krispie buns.
Find out how we got on later this week!
Joe made cornflake and rice krispie buns.
Find out how we got on later this week!
Sunday, 29 January 2012

Friday, 27 January 2012
Friday favourites!
Each Friday I am going to share a food related favourite something, be that a recipe, ingredient, cookbook, food, bit of cooking kit, food purchase. And so, let us begin...
Friday favourites...and I'm in love!
Please join me this week by appreciating Vanilla Extract in all it's glory. Until very recently, I've always been a vanilla essence girl. My passion for vanilla extract began when I was watching a re-run of Lorraine Pascale's "Baking made easy". Lorraine, looking all glamorous and gorgeous, - ok then, and a little bit smug truth be told, or at least that's what I thought at the time - told us that she 'would always prefer to use either vanilla pods or vanilla extract but NEVER, vanilla essence". Lorraine left it at that. No further explanation, just the suggestion that vanilla essence really wouldn't do.
"Well", I thought to myself feeling like a second-rate-cooking-baking-type-of-person, "I'm not sure I see what the vanilla-fuss is about". To be completely honest I thought Lorraine was being more than a little bit sniffy about this whole vanilla issue. Until, that is, I saw this bottle looking down at me from the supermarket shelf.

So Lorraine, I salute you!
Just one thing though. When I tried making the 'red velvet celebration cake' from your recipe on the BBC website, I noticed that there, listed in the ingredients was 'vanilla essence'. And as we both now know Lorraine, that, would never do.
Friday favourites...and I'm in love!
Please join me this week by appreciating Vanilla Extract in all it's glory. Until very recently, I've always been a vanilla essence girl. My passion for vanilla extract began when I was watching a re-run of Lorraine Pascale's "Baking made easy". Lorraine, looking all glamorous and gorgeous, - ok then, and a little bit smug truth be told, or at least that's what I thought at the time - told us that she 'would always prefer to use either vanilla pods or vanilla extract but NEVER, vanilla essence". Lorraine left it at that. No further explanation, just the suggestion that vanilla essence really wouldn't do.
"Well", I thought to myself feeling like a second-rate-cooking-baking-type-of-person, "I'm not sure I see what the vanilla-fuss is about". To be completely honest I thought Lorraine was being more than a little bit sniffy about this whole vanilla issue. Until, that is, I saw this bottle looking down at me from the supermarket shelf.

"Oh my." I had to have it. And now, there is simply no going back. Oh, the smell, Oh, the flavour. Oh, just having that bottle gazing down at me from my kitchen shelf.
So Lorraine, I salute you!
Just one thing though. When I tried making the 'red velvet celebration cake' from your recipe on the BBC website, I noticed that there, listed in the ingredients was 'vanilla essence'. And as we both now know Lorraine, that, would never do.
 |
| My attempt at the 'red velvet celebration cake' for my friend, Sara's birthday. |
Thursday, 26 January 2012
Joe and Ju decorate cakes with sugar paste
For quite a while, I'd fancied having a go at decorting cakes with sugarpaste. I have for some time been harbouring secret thoughts that with a bit of practise I could become really good at this...that it could become my 'thing' as it were.
My first attempt a few weeks ago was for the Star Wars party we had for Joe and Andy's birthday - yes, they share the same birthday. As first attempts go, some would say that R2-D2 as possibly a little ambitious. Especially for a woman who has very little spare time on her hands. I would have to agree. I gave it my best shot though and this was the result...


We used icing cutters to make the flowers which makes life a lot easier! The flowers were then easily stuck on with edible glue. We finished off with a pretty ribbon.

All of the cakes above were made following Mary Berry's 'perfect victoria sponge' recipe which I'll post another day.

I am most definitely a novice. I have a lot to learn. I have a lot of 'kit' to collect - certainly some cake smoothers wouldn't go amiss! But y'know, I really enjoy doing this and if for no other reason than that then I shall continue!

My first attempt a few weeks ago was for the Star Wars party we had for Joe and Andy's birthday - yes, they share the same birthday. As first attempts go, some would say that R2-D2 as possibly a little ambitious. Especially for a woman who has very little spare time on her hands. I would have to agree. I gave it my best shot though and this was the result...

Both Joe and Andy were impressed and that was good enough for me. I used ready made sugarpaste which is now readily available in supermarkets. And decrated with a tube or bought blue icing.
My second attempt (last week) became a joint venture with Joe. I was delighted that he wanted to help decorate the cake I had made for my Mum's birthday. This was the finished product...

We used icing cutters to make the flowers which makes life a lot easier! The flowers were then easily stuck on with edible glue. We finished off with a pretty ribbon.
The following day I was busy cake making again. This time for the Harry Potter party for Joe's school friends to come round as a belated birthday celebration - hardly anyone attends if you hold the party in the school holidays and so we wait until everyone has settled back in to school. I was in a massive rush to decorate this cake just in time for the party and unfortunately ran out of the icing I used to do the writing - hence the two tone appearance...

All of the cakes above were made following Mary Berry's 'perfect victoria sponge' recipe which I'll post another day.

I am most definitely a novice. I have a lot to learn. I have a lot of 'kit' to collect - certainly some cake smoothers wouldn't go amiss! But y'know, I really enjoy doing this and if for no other reason than that then I shall continue!

Tuesday, 24 January 2012
Pasta with chicken and choritzo
Ok. I hold my hands up, the only reason this recipe came about was due to another attempt to use up leftover roast chicken. However, as it was very tasty, I would now cook this again from scratch if we ever found ourselves in the unlikely position of not having leftover chicken in the fridge - yes, we eat a lot of roast chicken in our house!
I used these ingredients:-
A couple of handfuls of shredded roast chicen (or you could use 2 small uncooked chicken breasts cut into strips)
A handful of chopped choritzo
2 cloves of garlic, finely chopped
A generous pinch of dried oregano
A generous spinkle of black pepper
1 glass white wine
2 tins chopped tomatoes
2 tablespoons olive oil
Parmesan to serve
Heat the olive oil in a large saucepan over a medium heat. If using uncooked chicken then pan-fry until cooked through and then set to one side. Add a little more oil to the pan if necessary and lightly pan-fry the choritzo to release the juices as this will help to flavour the sauce. Set aside the choritzo.
Lightly fry the garlic and then add the oregano and black pepper and stir through. Now add the glass of wine. Stir and cook for a couple of minutes. Add the tomatoes and bring to the boil Simmer for approx one hour until the sauce has reduced and thickened and is lovey and rich to the taste.
Add the cooked chicken and choritzo and heat through. Serve on cooked pasta of your choice and serve with a generous helping of grated parmesan.
Monday, 23 January 2012
Week 3 of our 2012 culinary challenge!
Ju made up a pasta recipe - Roast chicken and choritzo pasta.
Joe and Ju played with sugarpaste and iced a couple of cakes.
Joe and Ju played with sugarpaste and iced a couple of cakes.
Friday, 20 January 2012
Pizza not so express
I have never previously made an entite pizza from scratch. I felt really quite virtuous about doing so though. I was toying with a choice of two pizza base dough recipes of the thin and crispy variety:- a Jamie Oliver recipe from his first book "The Naked Chef" and a recipe from the "Kids Baking" book.
In the end I went with the 'Kids Baking' recipe thinking "if it's aimed at kids from age 6 upwards then how tricky can it be?" And, as hoped, it was suprisingly simple. The only note of caution I would add is that the time the dough can take to 'prove' can vary depending on a lot of things so don't panic if very little seems to have happened in the time stated in the recipe.
These are the ingredients for the pizza base dough:-
355g plain flour (plus extra for kneading) - I found it better to use half plain flour and half strong white flour
7g rapid-rise yeast powder
2 teaspoons sugar
2 & 1/2 teaspoons salt
240ml (8 fl oz) warm water btween 46C and 52C - I don't (yet!) own a cooking thermometer and so it was guess work wich is a little risky as the wrong temperature could impact on proving the dough (affecting the way it rises)
2 tablspoons olive oil
1 teaspoon vegetable oil (or more olive oil)
To begin, put the flour, yeast, sugar and salt into a large bowl ad mix together using a wooden spoon.
Add the warm water and olive oil and mix together until a 'rough shaggy dough forms' - this description of the dough is taken directly from the book and describes perfectly how the dough looks.
Now it's time to knead the dough - you need to put some effort in to give the dough (and possibly yourself) a good workout!. Keep the surface you are working on well floured. I used the heal of my hand, pushing the dough away from me before folding back in, turning the dough 'ball' and repeating. I did this for 10 minutes until the dough had lost it's stickiness and felt smooth.
I then put the vegetable oil into a clean bowl in which I then placed the ball of kneaded dough ensuring it was coated with the oil. I tightly wrapped clingfilm around the bowl before putting it beside the fire to rise.

Three hours later (rather than the 45 minutes suggested in the recipe) and my dough had finally doubled in size! When I made the dough again this week, I replaced half of the plain flour with a strong white flour and found the dough had risen much quicker taking just over an hour. A good test to see if the dough is risen enough is to poke ypur finger into it and if the indent stays the dough is ready. If the indent in the dough springs back out leave the dough a little longer before checking again.

Once risen I divided the dough into 3 equal parts and pushed each part into a rough ball shape. I the used the heal of my hand to flatten each ball before using my fingers to press and stretch the dough into a 'rustically' round (ish pizza shape which was then placed onto a baking tray lined with baking parchment.
Rather than using passata I made a tomato sauce, to spread onto the dough, that is loosly based on Jamie Oliver's tomato sauce, another recipe from his first book - I'll post this recipe another day. Grated cheddar cheese was sprinkled on top with slices of mozzarella cheese, choritzo sausage and torn basil leaves.

The pizzas were baked in the oven at 230C for 10 to 15 mins depending on the size of the pizza. Be careful to kee checking them though as they will quickly burn given only a little too long - as I discovered! Thakfully, two of the three I made survived the ordeal well and were ready to eat.
Yum! Shop bought pizza will never taste as good again!
This week I've used this recipe again to make 20 bases (yes, 20!!!) for my eldest son's birthday party at the weekend, but that's another story entirely...
Tuesday, 17 January 2012
Jacket spuds!

After turning the oven on to heat up to 200C I tried to entice Joe into a postive frame of mind by suggesting we would go and 'kill some spuds' - meaning we needed to gently prick each potato with a fork before poppiing into the microwave for about 10 minutes to soften. We always tend to use the mircrowave first to speed things up as we don't allow ourselves enough time for the potatoes to bake for long enough solely in the oven.

After being transferred from the microwave to the oven we let the potatoes bake for approximately 1hr. It depends on the size of the potatoes and how crispy you like them - we like them crispy! As Joe prefers to not eat the skins - I'm hoping this will change in the future! - and so once cooked, we scooped the fluffy potato out and squished with a fork, adding butter and mature cheddar cheese, grated by Joe, before serving in a bowl - minor the skins! For those of us who enjoy the skins, serve simply in the skins, squished or not!


Some of our favourite toppings include:- chilli, beans and cheese, tuna and mayonaise, cheese and crispy smoked bacon.
Enjoy.
Monday, 16 January 2012
Week 2 of our 2012 culinary challenge!
Ju's new recipe was... pizzas!
Joe stuck with the potato theme and learned to cook baked (jacket) potatoes.
Joe stuck with the potato theme and learned to cook baked (jacket) potatoes.
Thursday, 12 January 2012
Week 1 - The chicken soup debacle
Having felt that the Yorkshire Puddings had gone well I thought I would have a go at another new recipe as I was feeling that maybe the Yorkshire Pud's would be thought to have been too simple. I think it would be fair to say that I maybe got a little ahead of myself and was feeling a tad over-confident.
 Having some left over chicken that was still on the carcess I decided on a Chicken Soup recipe by the wonderful Tessa Kiros in my favourite looking cookery book "Apples for Jam". I love love love this book. I also have Tessa's 'Venezia' book which I have cooked nothing from as yet but love to peruse for the wonderful images of Venice held within the books pages.
Anyway, back to the chicken soup. It did not go well. Mainly because I decided to adapt the recipe rather than follow the recipe to the letter and using all of the ingredients listed. I should have been wary when I spotted the word 'broth' as I prefer my soups to be thick and creamy but I was, I think, seduced by the word 'velvety'.
These were the ingredients listed in the recipe:-
1 chicken (approx 1.2kg)
1 leafy celery stalk
2 small carrots
1 small leek
12 black peppercorns
50g butter
30g plain flour
1 egg
2 tablespoons marsala or port
Freshly grated parmesan or pecorino cheese

I didn't have the egg, the marsala or port, or the cheese. And also, I was using very little (already cooked) chicken and mainly working with the bones - yes, ridiculous I know! Assuming you do have all the ingredients, this is what should have happened...apparently...
The (uncooked) chicken should be put into a pot with the chopped vegetables and about 3 litres of water. Add a pinch of salt and bring to the boil. After skimming any excess oil from the surface, then simmer for 1hr 30mins. Next, set aside the chicken and strain the remaining liquid into a clean pan. Take the meat from the chicken, tearing half of it into stips and blending the other half.
Melt the butter in a pan then add the flour and stir together. Bit by bit, add the strained liquid, mixing well each time to ensure there are no lumps. When all the liquid has been added, simmer for 10mins and then add the marsala or port.and all of the chicken meat - both the blended and the strips. Then simmer for another 10 mins. Add the beaten egg to the chicken broth stirring through for a couple of minutes over a very low heat.
Serve immediately with a generous spoon of the cheese on top.
Sounds delicious.
Back to my reality. Basically, I made what was, in effect, a good chicken stock. I should have quit whilst I was ahead. But no. I had a last ditch attempt at thinkening the 'soup' by adding - wait for it...two paxkets of asparagus cuppa soup. I know I know. Clearly the wrong thing to do. The finished result, at best, was unpleasant.

I have, however, learnt a valuable lesson. Ingredients are listed for a reason. Whilst some substitution and improvisation may be ok, there is a limit. I shan't be making that mistake again!!

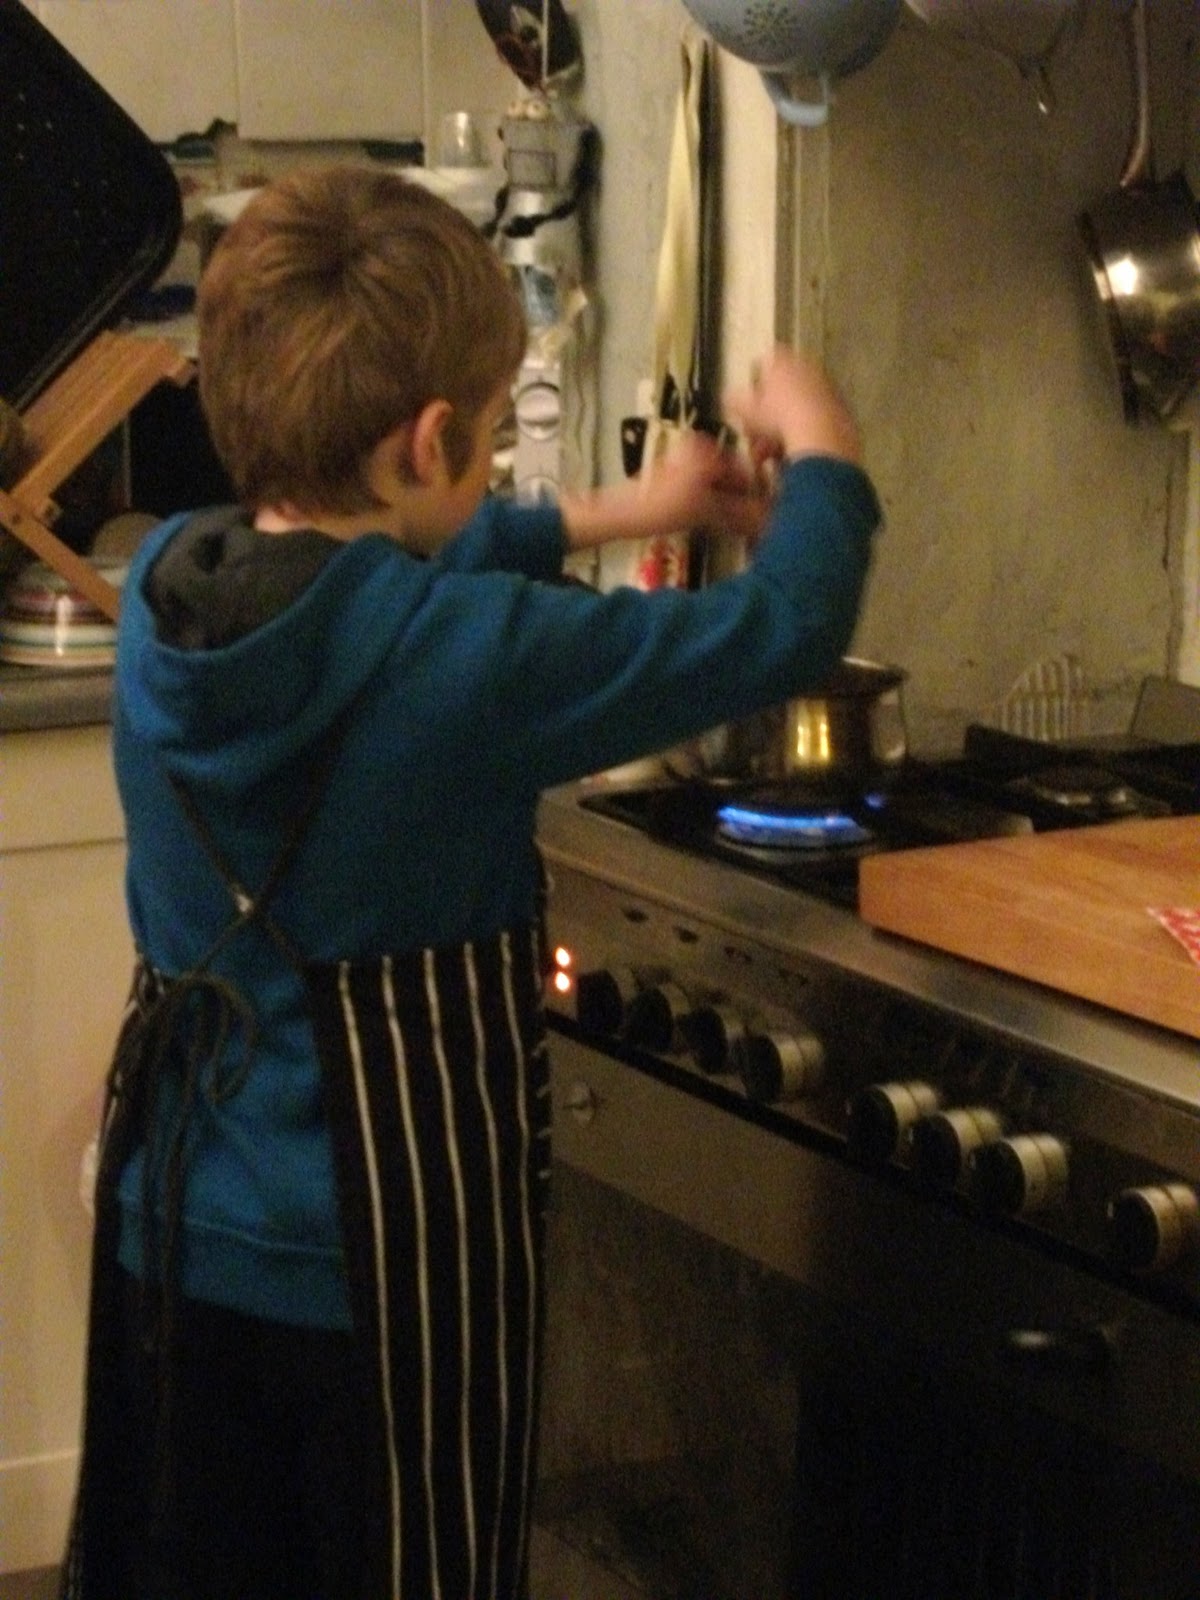
Week 1 - Let's do the mashed potato - Joe makes mashed potato!
We started off with me demonstrating how to peel a potato. This was tricky for Joe but he had a go so that he could at least get a feel for how it's done. He then very carefully chopped the potatoes up - with me helping out by holding the potato and feeling nervous about whether or not we would both escape with all of our fingers in tact!
Joe then put the chopped potatoes into a saucepan of cold water which we put on to boil for approximately 20mins until the potatoes were soft. From this point until the potatoes were cooked, Joe asked every 5 mins if the potatoes were ready - a little bit like the culinary version of "are we nearly there yet?".
Once cooked, we drained and began the fun bit - the mashing! A generous knob of butter and a splash of milk helped us on our way and slowly we pushed through the spuds, crushing them to within an inch of their lives. We finished off by beating the mash with a wooden spoon which makes them nice and creamy in texture.
And then we proudly served them up with our roast dinner.
"These potatoes taste just a little bit better today Mummy" announced Joe as we tucked in.
Result :-)
Wednesday, 11 January 2012
Week 1 - Good old Yorkshire puddings!
I (Ju) decided to start nice and easy with a recipe made up of only four ingredients - Yorkshire Puddings! As a girl who acutally lives in Yorshire, in the UK, there is really no excuse for me not being able to make these. And a roast beef (or any other roast meat really) dinner just isn't the same without a decent Yorkshire pud!
I followed the directions provided in "The best of Mrs Beeton's Easy Everyday Cooking" cookbook.
This book is a great guide to mastering the basics of everday cooking. This is the recipe:-
100g/4oz plain flour
1 egg (beaten)
150ml/ 1/4 pint milk
150ml/ 1/4 pint water
A pinch of salt is optional and you will need fat - oil, butter or meat fat juices - to cook the puddings in.
To make the batter, the flour should be sifted into a bowl - with the pinch of salt if using. The beaten egg should be added and the milk gradually worked in. Beat the mixture for a few minutes until it is smooth and bubbly. Stir in the water. The mixture can be used immediately or can stand in the fridge until you are ready for it.
I put a knob of margerine in the tins I was using - this mixture will make either 6 small (7.5 cm) puddings or 1 large pudding. - and then put them in the oven to let the oil heat for 5 minutes until it is very hot. Then pour the mixture into the tin(s) and bake the puddings on the top shelf of the oven set to 200C for 15 to 20 mins until they have risen and are golden brown.
I tried spreading the mixture between three small tins and one larger tin which meant that there wasn't really enough batter for the larger tin. Nevertheless, the appearance of the finished puddings were reasonably good despite the larger pudding being a little flat! And the main thing was that Joe, Andy, my parents and me thought that they tasted good.
I followed the directions provided in "The best of Mrs Beeton's Easy Everyday Cooking" cookbook.
 |
| "Dine we must and we may as well dine elegantly as well as wholesomely" Mrs Beaton |
100g/4oz plain flour
1 egg (beaten)
150ml/ 1/4 pint milk
150ml/ 1/4 pint water
A pinch of salt is optional and you will need fat - oil, butter or meat fat juices - to cook the puddings in.
To make the batter, the flour should be sifted into a bowl - with the pinch of salt if using. The beaten egg should be added and the milk gradually worked in. Beat the mixture for a few minutes until it is smooth and bubbly. Stir in the water. The mixture can be used immediately or can stand in the fridge until you are ready for it.
I put a knob of margerine in the tins I was using - this mixture will make either 6 small (7.5 cm) puddings or 1 large pudding. - and then put them in the oven to let the oil heat for 5 minutes until it is very hot. Then pour the mixture into the tin(s) and bake the puddings on the top shelf of the oven set to 200C for 15 to 20 mins until they have risen and are golden brown.
I tried spreading the mixture between three small tins and one larger tin which meant that there wasn't really enough batter for the larger tin. Nevertheless, the appearance of the finished puddings were reasonably good despite the larger pudding being a little flat! And the main thing was that Joe, Andy, my parents and me thought that they tasted good.
Sorry but I forgot to take photos. I'll try harder next time. For anyone who is unfamiliar with the concept of the Yorkshire Pudding, here's a picture I've borrowed from BBC Good Food magazine to show you what they look like:-
 |
| "Yorkshire puddings"! Image taken from BBC Good Food Magazine. |
Tuesday, 10 January 2012
Week 1 of our 2012 culinary challenge!
Ju made:- Yorkshire Puddings; Chicken Soup
Joe learnt how to cook:- Mashed potato
Find out how we got on very soon...
Joe learnt how to cook:- Mashed potato
Find out how we got on very soon...
Welcome to Cocoa & Fig
 Hello and thank you for dropping by to take a peek at this brand new blog. In the blog I started writing a few months ago entitled 'Ju's musings on life' there was recently a post that laid out the culinary aims of me (Ju) and my eight year old son (Joe) for 2012 :- I am hoping to cook a new recipe each week and Joe is going to build on his love of baking, and will also, be learning how to cook the basics.
 We had intended to write about these endeavours on the original blog but then thought it would be better to give these food adventures a home of their own. Which is here, on Cocoa and Fig. We will be providing weekly updates about how the previous week had gone - the good, the bad and the ugly! We hope you enjoy!
Let us begin...
Subscribe to:
Posts (Atom)